Conditional Access 101 for Windows 365

An end user responding to a MFA prompt on their smartphone - a quick action they’re now used to taking every morning.
Security is a must in a modern EUC environment, and organizations finally catch a break in that one of the most important steps to take is also one of the easiest. Multi-Factor Authentication, aka MFA, protects EUC environments from one of the most critical attack vectors - end user logins! I once read a statistic that 99+% of attacks would have been stopped in place if only the organization enforced MFA.
Mercifully, Azure offers an easy way to specifically target Windows 365 logins specifically - Conditional Access. In this blog, I’ll show you how to activate it and a few of my top tips & tricks for making it more nuanced, delivering a smoother end user experience.
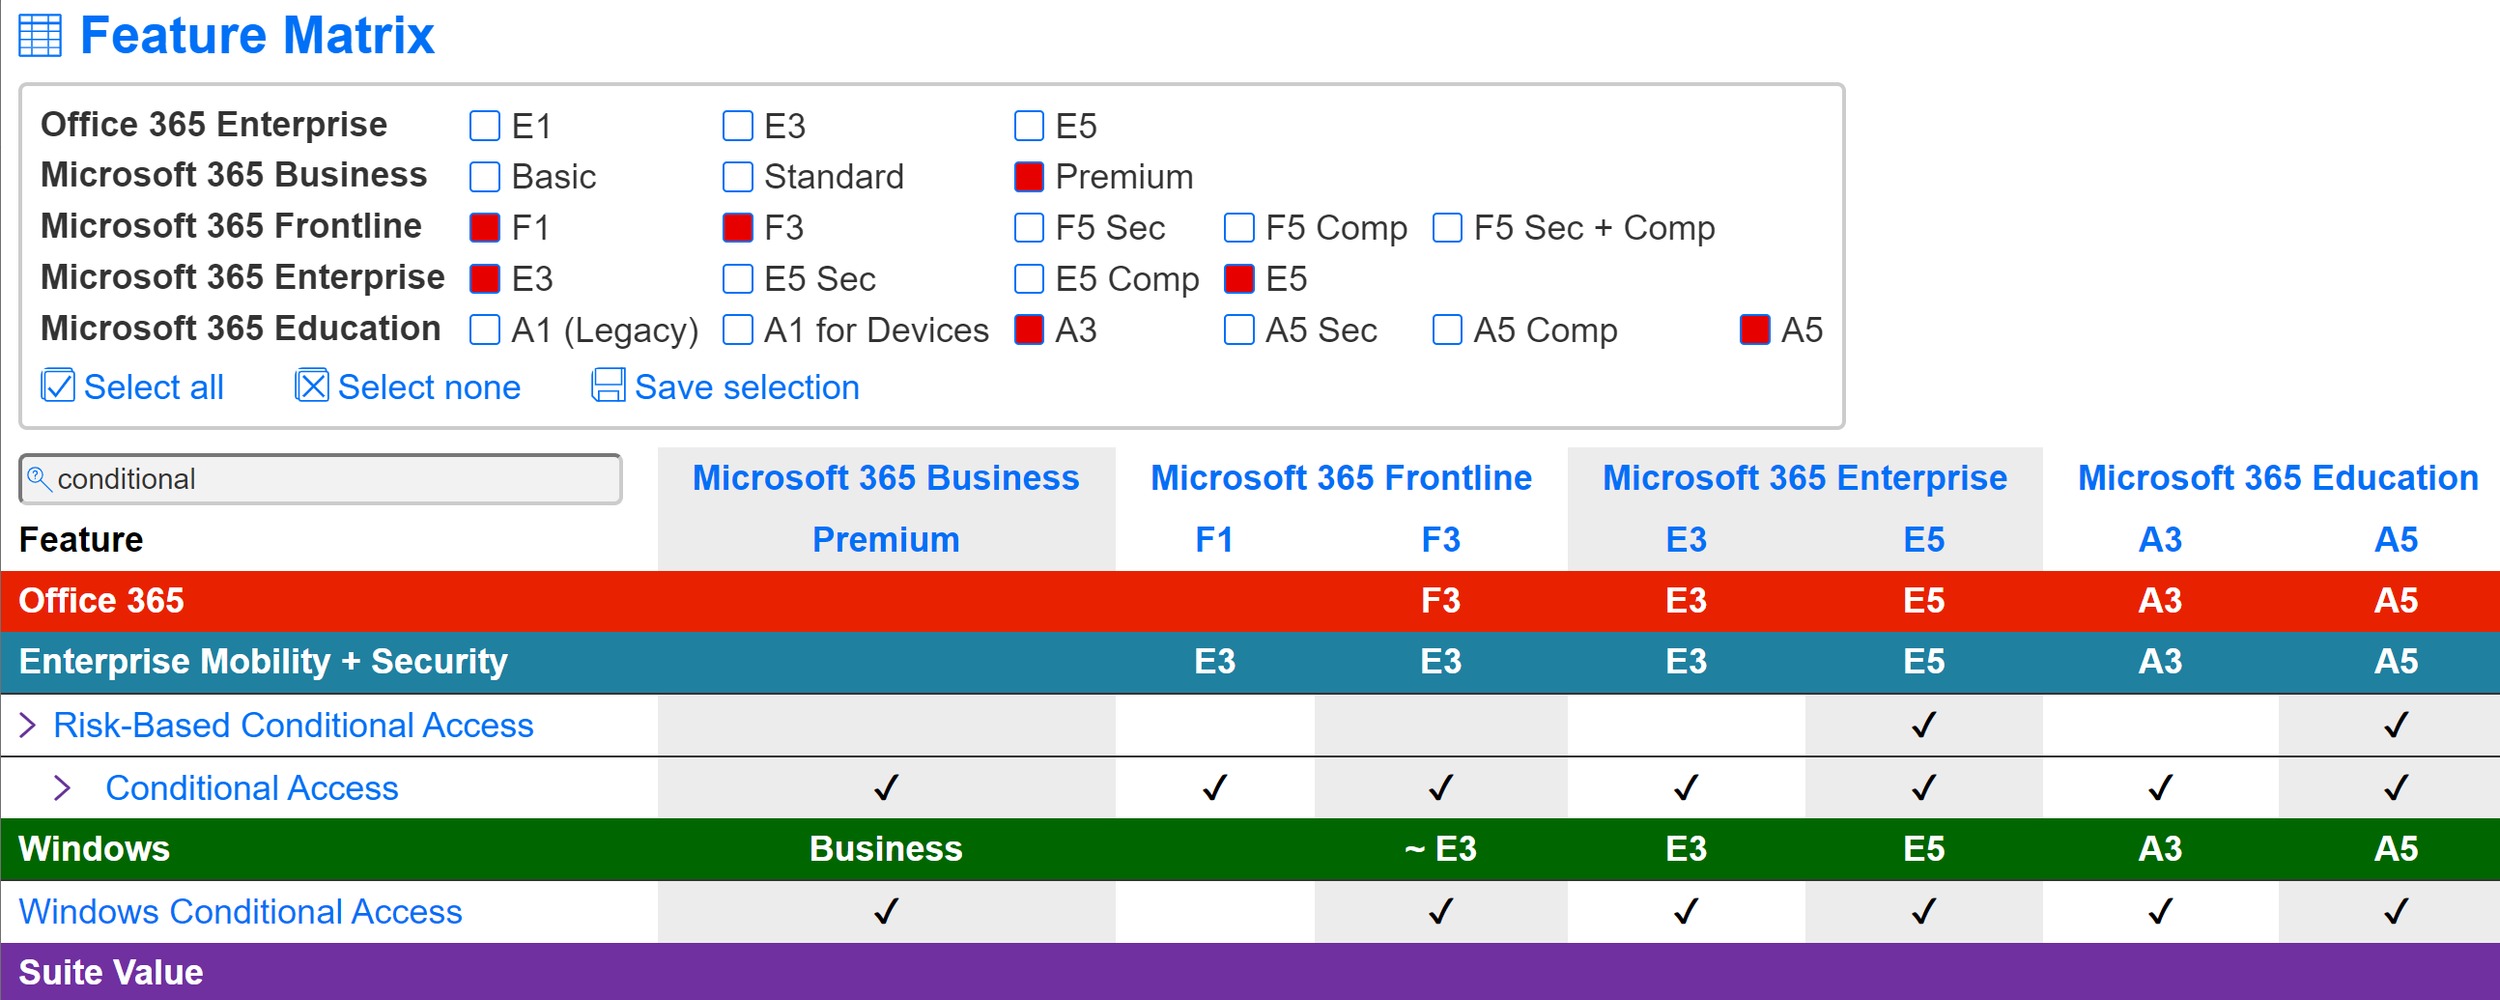
We can’t get too far into discussing how Conditional Access works without covering what unlocks it, though. The specific licensing requirements can be found here: https://docs.microsoft.com/en-us/azure/active-directory/conditional-access/overview#license-requirements. However, I’ve always found that it’s more useful to visualize what plans contain any given service or function. Microsoft Maps, which can be found at https://www.m365maps.com, is an excellent resource for understanding
The TL;DR here is that by the time you’ve obtained the licensing for Windows 365, you have access to Conditional Access.
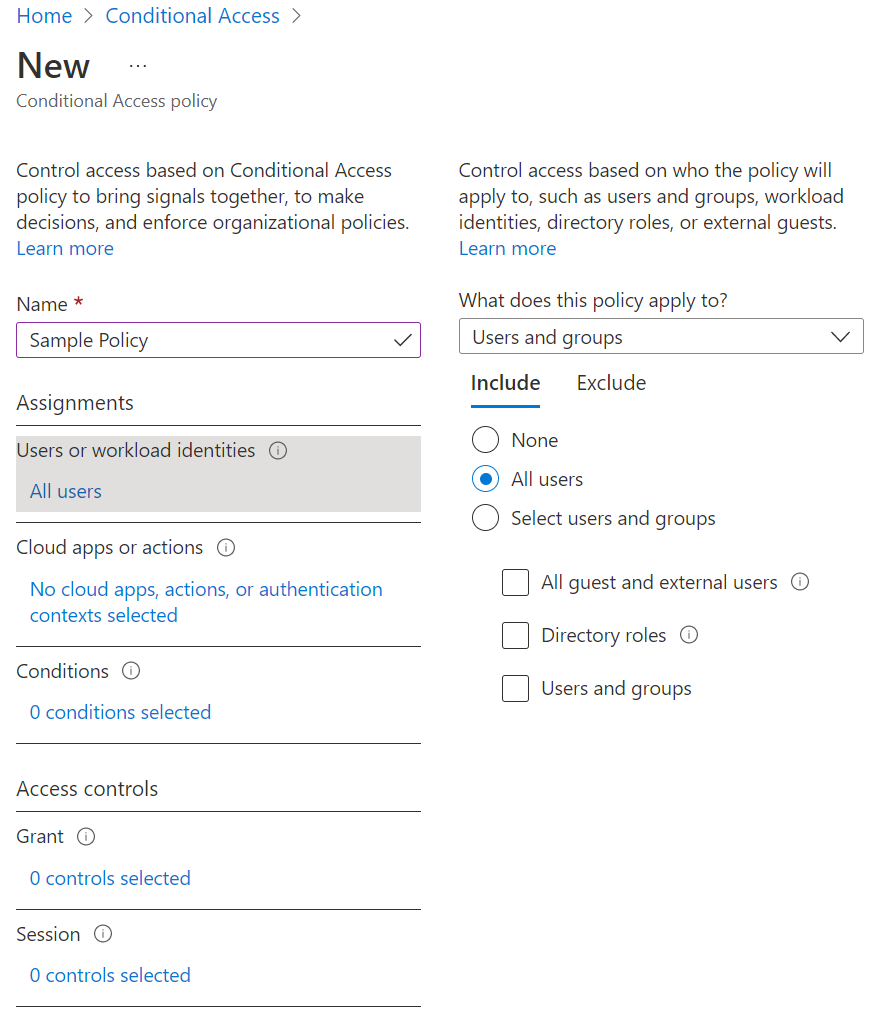
Setting up Conditional Access by logging into the Azure portal and navigating to Conditional Access. Note: you’ll want to make sure you have one of these roles: Global Administrator, Security Administrator, or Conditional Access Administrator.
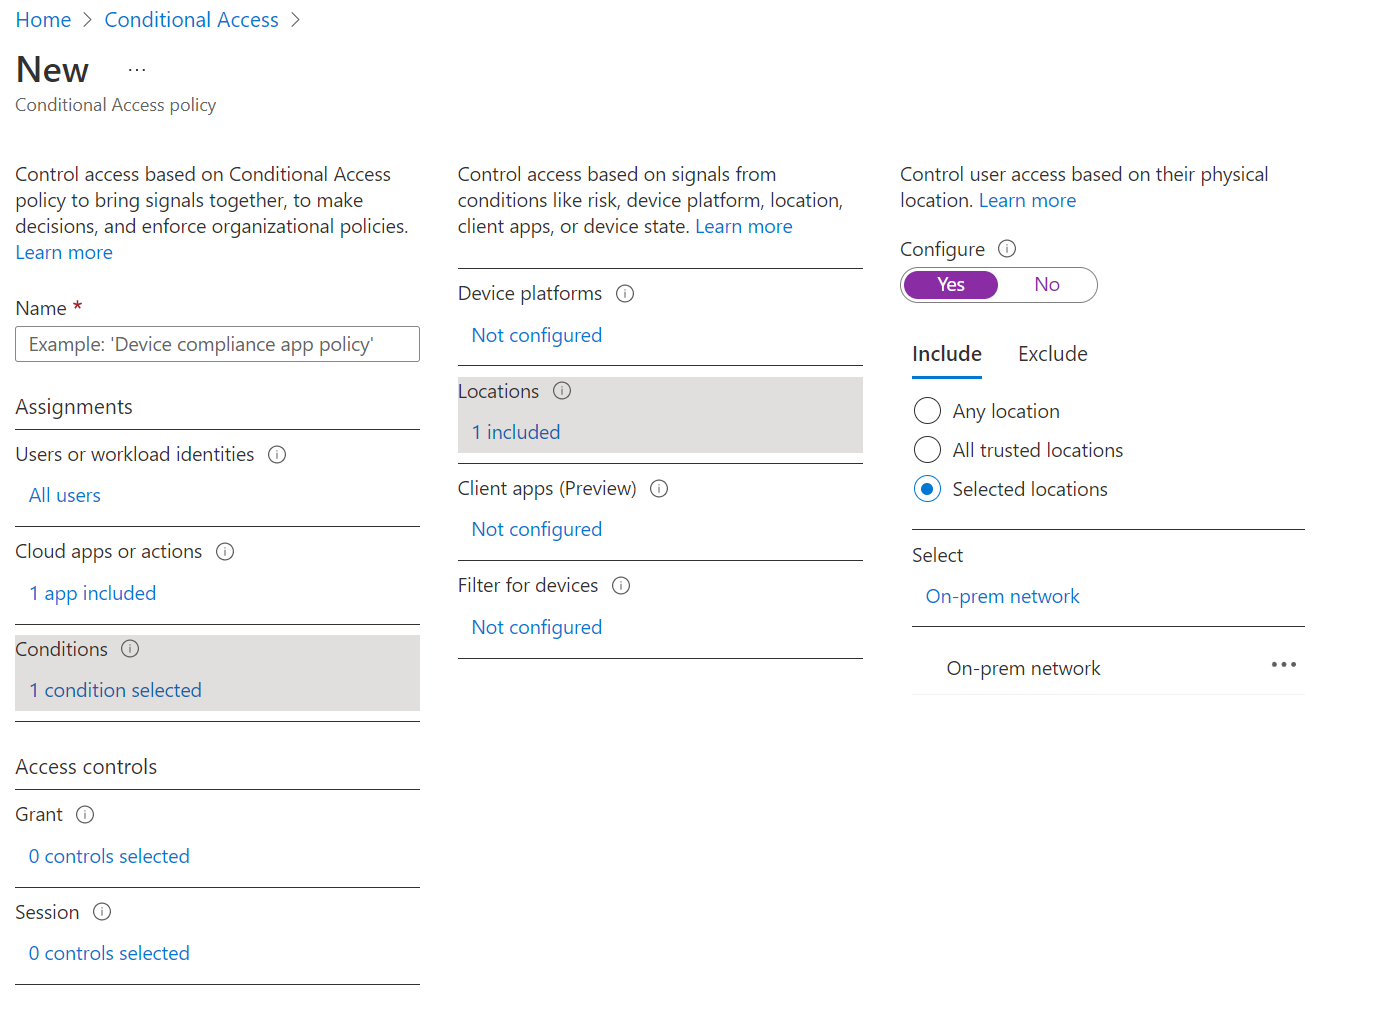
Next, click New policy and give your policy a name. Azure recommends giving this a meaningful, standardized naming convention. I’ve use this framework successfully:
Environment: Production or test
Control: Block, Allow, Require configured control
Who this applies to: All or Single User(s), Individual or Ring group (R1,R2), Azure AD Role
Resource: All apps or individual apps
Conditions (optional): If there are conditions specified like network, platform etc.
In this case, a pair of examples might be:
P-Require_MFA-for-All_Users-W365 (no conditions, so no "when" or "condition")
P-Require_MFA-for-All_Users-W365-when-Not_On_Corporate_Network (require MFA only if the user isn't logging into Windows 365 from the corporate network)
In this case, though, we’ll just call this Sample Policy for simplicity.
Click Assignments, then Users and groups and then select All users. There’s no good reason to NOT have MFA in place for every end user.
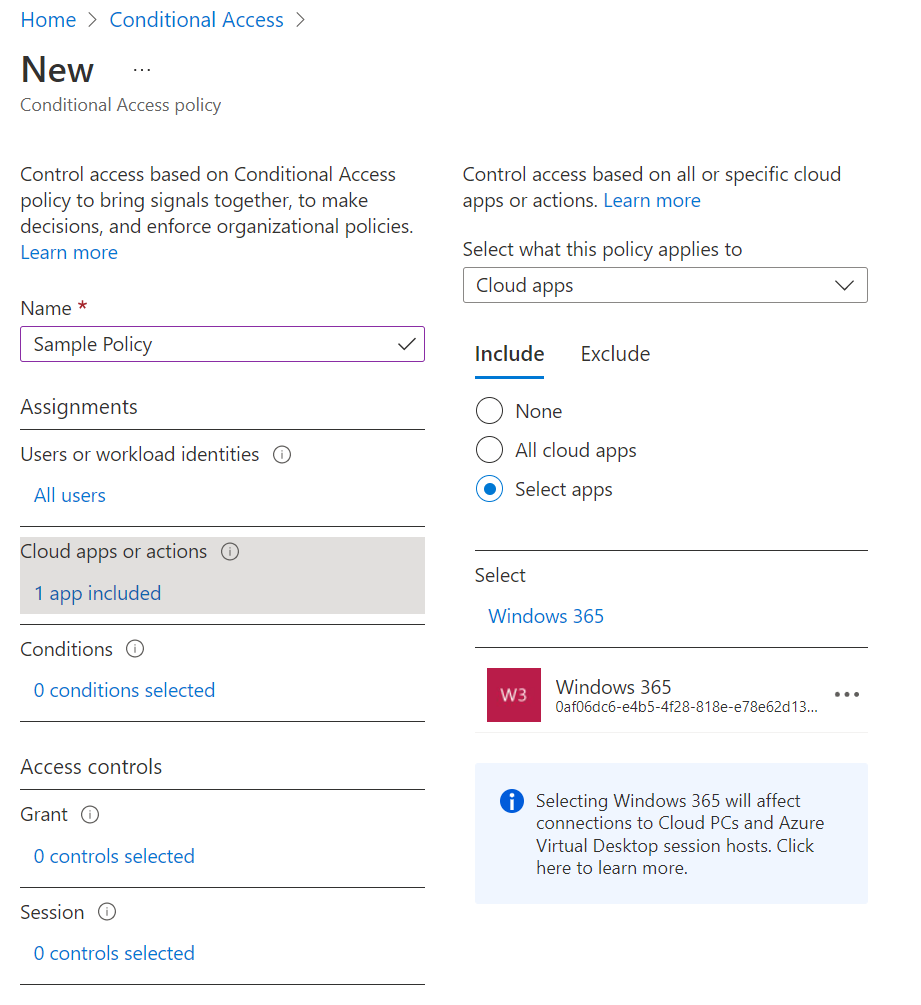
Next, click Cloud apps or actions, then Include and search for Windows 365.
We’ll skip Conditions for now and come back to it later…
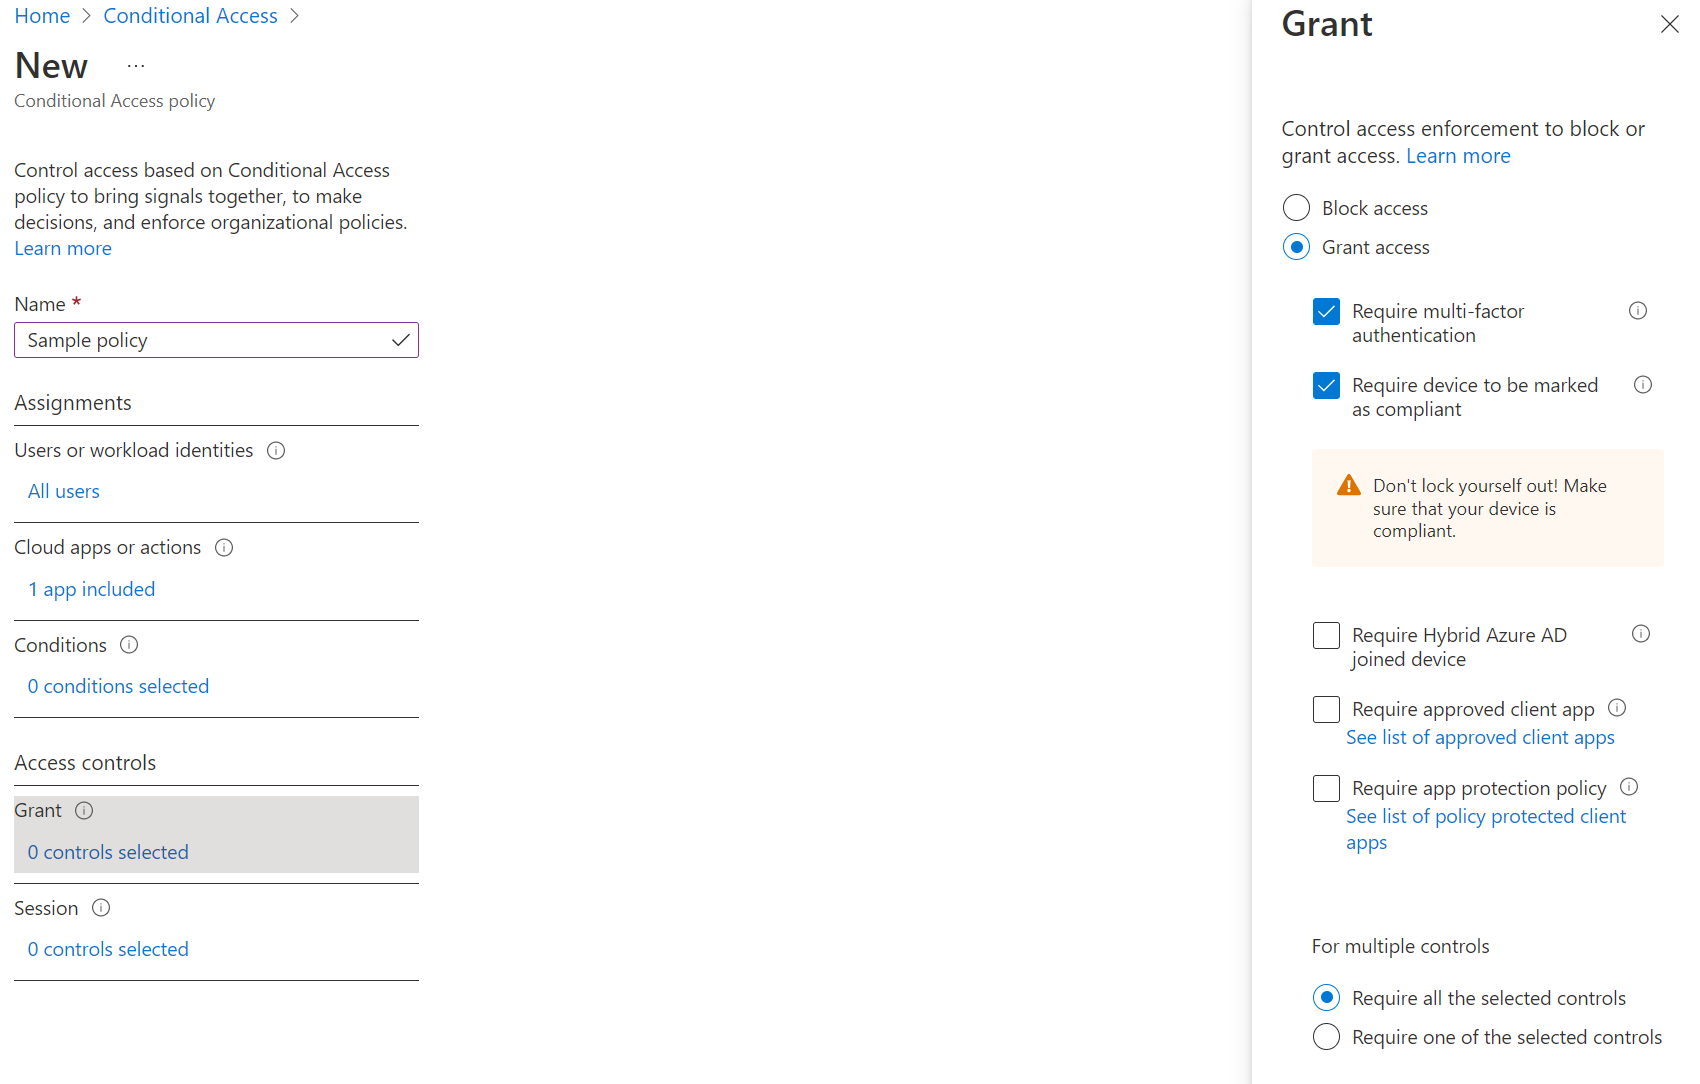
Next, select Access controls and Grant, select Grant access, and click the radio button Require multi-factor authentication and click Select.
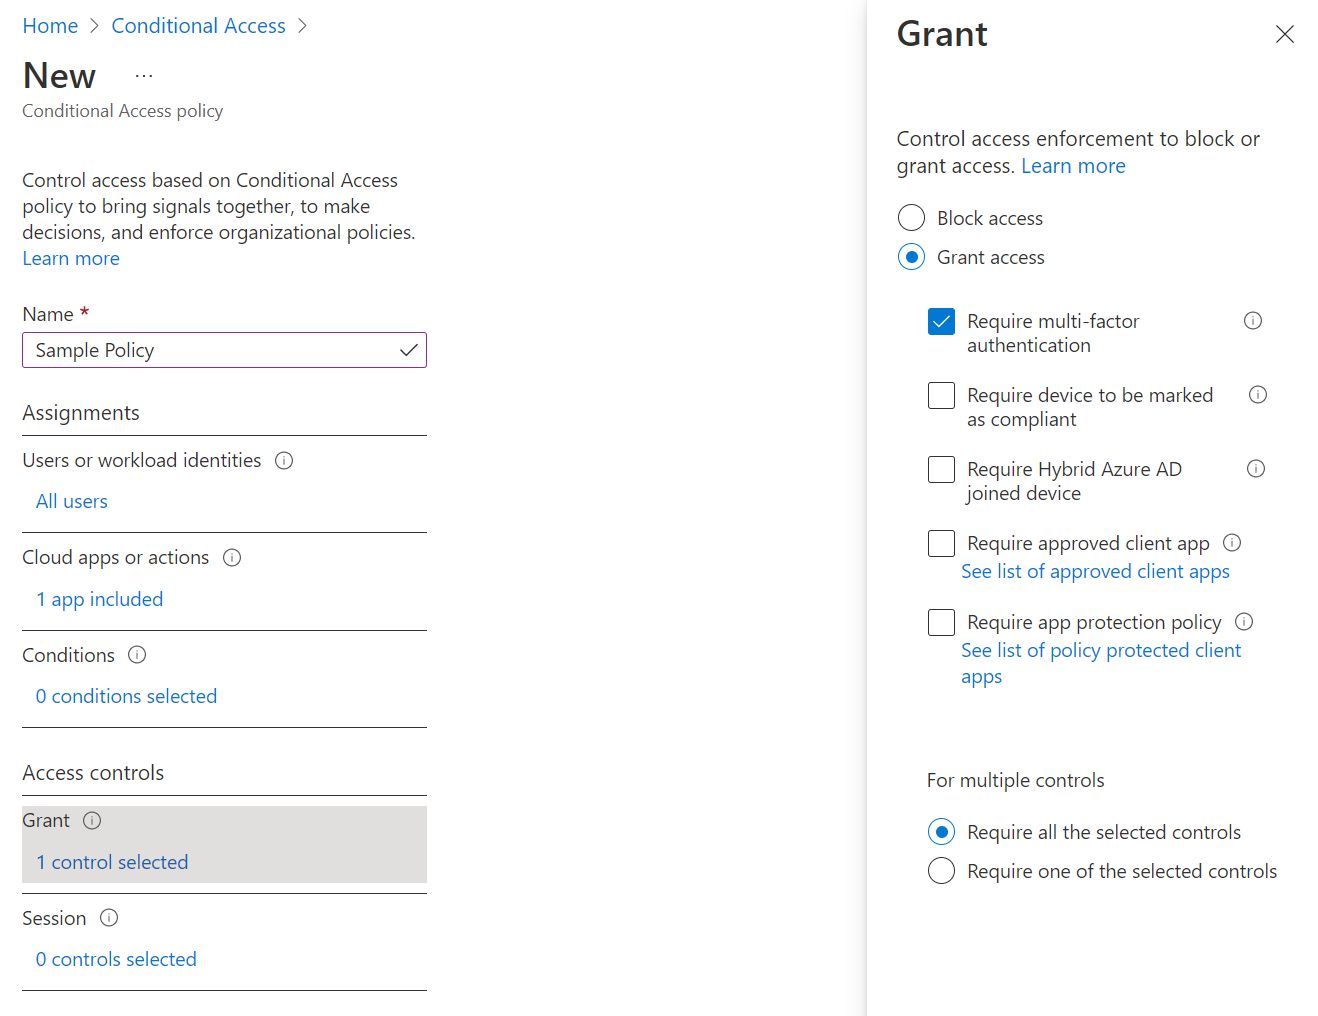
We can skip past the Session settings, especially if this is your first foray into Conditional Access.
Note: you can optionally apply these policies in Report-only mode if you’re unsure of the impact it will have, but I recommend enabling the policy straightaway. Finally, click Create and you’ve done it - you have a specific, purpose-built MFA policy specifically for Windows 365.
That’s a great first step, but there’s more you can do with Conditional Access and MFA…
Here are my top 3 best practices for streamlining the end user experience:
Pivot MFA requirements based on named locations
Modifying Conditional Access policies when users are logging in from Intune Registered Devices
Best Practice #2 - use the What If? Tool
Conditional Access and named locations
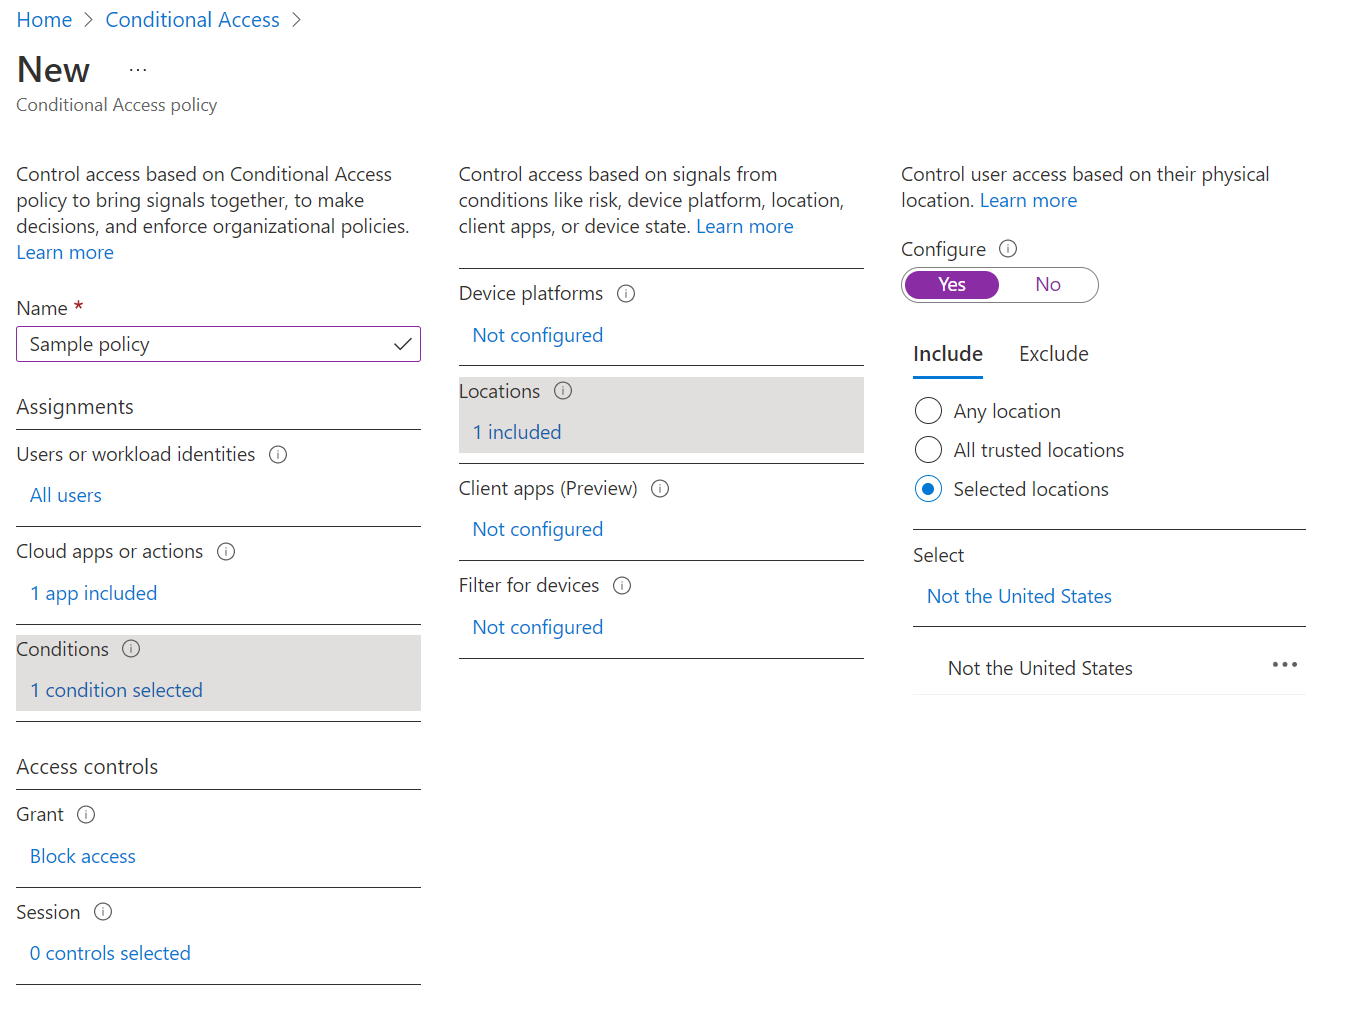
Leveraging named locations allows you customize access and MFA requirements if a user is connecting from known named location. A prime example includes only allowing access from known/trusted locations like the on-prem network. First, navigate to Azure Active Directory, then Security and named locations and enter your on-prem network details.

Next, adjust your policy Conditions to only allow authentication attempts from one specific location - the on-prem network. You can also choose All trusted locations in the event that you have multiple regional offices.
You can also elect to blocking regional (in this case, all non-US based) authentication attempts by modifying your policy’s Conditions to a set of countries (Not the United States, below) and selecting Block under the Grant step.
Conditional access and Intune registered devices
If you’ve invested the effort into rolling out Windows 365, you likely already have a strong Intune skillset. Why not take advantage of that and require that the device the user connects from be Intune compliant as well? This may be too restrictive in the work-from-anywhere era, but the point is that you can choose to either add additional certainty that a user is who they say they are by selecting this OR elect to do something like NOT require MFA if they’ve connecting from a device that’s registered with Intune already. It call comes down to the organization’s security posture and policies.
To customize this, select Grant and then check the box requiring devices to be marked as compliant. Note that you can require that only one of these conditions must be met or that ALL of them must be met.
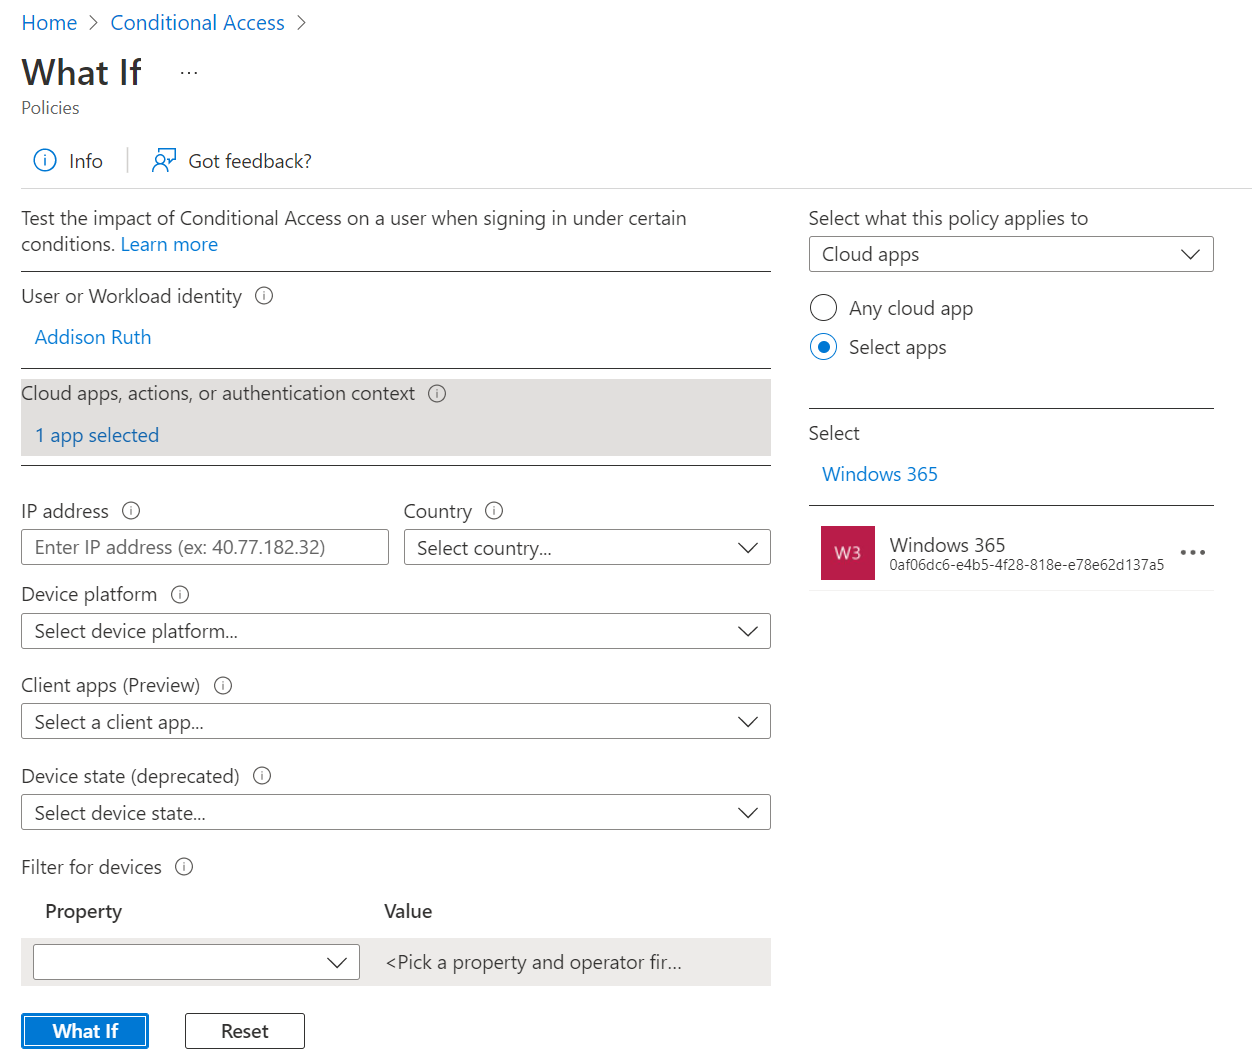
The What IF tool & Sample Scenarios
The What If tool is an incredibly useful concept - it lets you test your policies while they’re in Report-Only mode, or to test what’ll happen in a specific scenario (like a VP who is travelling to Europe and will want to check in on things each night).
Provide a user’s name, what they’re attempting to access and where they’re attempting to access it from and the What If tool will detail what level of access control or experience the user will have. This is doubly useful if you’re iteratively improving your Conditional Access policies over time. Pretty cool stuff!
What type of Conditional Access best practices do you follow for Windows 365?